
As you’re probably already aware, we’re very close to the release of version 15 of FreePBX. One of my favorite new features in FreePBX is the GraphQL support that was added earlier this year. The support that was added for GraphQL makes it easier for external programs or systems to interact with a FreePBX system. For those of you not familiar with GraphQL, I hope this blog post makes a good introduction, and helps you to catch my enthusiasm for supporting GraphQL in FreePBX.
What is GraphQL?
GraphQL is a more modern way of programmatically querying applications. GraphQL allows the API user to be more specific about the query they would like to issue to the API. This allows the interaction between the client and server to be more streamlined, make fewer API calls, and be more performant.
GraphQL is a “data query language”, that was developed by Facebook. It is a specification for how to query an API over HTTP or HTTPS. You can think of it as being somewhat REST-like, but more declarative. With typical REST APIs, you ask the server to send you a representation of some sort of object. For example, you might do an HTTP GET to http://my.example.com/rest/v1/book/42 and the server would return some sort of stateful representation of object “book” with an identifier of “42”. If the “book” object has a large number of fields, the server is going to return every single one.
GraphQL is also used to query a server via HTTP or HTTPS and get a response — just like REST. Unlike REST however, GraphQL lets you specify the exact fields that you want returned. How? A client tells the GraphQL server exactly what it wants the response to look like, by sending the server the layout it wants for the responses. For example, let’s assume we have a GraphQL server that serves up information about books. The following GraphQL query shows how you would query the server to get the book with ID 42, with only its ID and title fields returned:
query {
  book(id: 42) {
    id
    title
  }
}
Why GraphQL instead of REST?
GraphQL is better at dealing with hierarchical data. To extend our “books” example a bit more, let’s say that each book has a link to an “author” object as well. Using REST, we’d have to GET a book object, parse the response to get the author ID, then GET the author object with that ID. It makes for a lot of back-and-forth requests for linked data. GraphQL, on the other hand, follows relationships between objects. For example, the following example query would automatically follow the link between the book and the author, and return the “firstName” and “lastName” of the author(s) associated with the books.
query {
  allBooks {
    book {
      id
      title
      author {
        firstName
        lastName
      }
    }
  }
}
GraphQL is also strongly typed. This means each field is either a built-in type (such as a string or an integer), or a specified type (such as a book or an author). With GraphQL, you never have to worry about what type of values you’re going to get back from the server.
GraphQL comes with a set of default scalar types out of the box:
- Int: A signed 32‐bit integer.
- Float: A signed double-precision floating-point value.
- String: A UTF‐8 character sequence.
- Boolean: true or false.
- ID: Represents a unique identifier for an object
Of course, a GraphQL server can (and often does!) define its own custom types.
GraphQL is also introspective. This means that there is built-in support for asking the server which methods are available, and which types of data can be returned. This makes a server self-describing in a way that makes it much easier for developers to explore the API and understand the results. Some GraphQL clients use this introspection to make developing with GraphQL much easier, as will be explained below.
GraphQL basic concepts
GraphQL has three basic types of operations that you can perform: queries, mutations, and subscriptions. A query is a request for information from the server. A query typically begins with the word “query”, and then the method you are querying, along with the details from that query that you want returned. For simplicity’s sake, if you leave off the word “query”, GraphQL will assume you’re doing a query. This means that the following two queries are functionally identical:
query {
  book(id: 42) {
    id
    title
  }
}

{
  book(id: 42) {
    id
    title
  }
}
Mutations are used to either create a new object, or to change values on an existing object. You can think of them as being roughly analogous to using POST, PUT, and PATCH on REST APIs. In the case of GraphQL, however, you’re always using an HTTP POST for your queries, mutations, and subscriptions. For example, the following mutation could be used to create a new book in our example API, and then return its ID:
mutation {
  createBook(input: {
    author: "John Q. Public",
    title: "Hoping for Better Weather",
  }) {
    id
  }
}
The last basic operation is a subscription. You use subscriptions to be notified when a new object is created, or an existing object is modified. Assuming the API has a subscription type of “newBook”, the following example would wait until a new book is created, then return it’s title and ID.
subscription {
  newBook {
    id
    title
  }
}
How do I get started with GraphQL in FreePBX 15?
Now that we have covered the basics of GraphQL, let’s dive into using the GraphQL support in FreePBX 15. To begin with, you’ll want to make sure that all of your FreePBX modules are up to date, and that you have the “API” module installed.
IMPORTANT NOTE: Please note that GraphQL support in FreePBX 15 is a technology preview, and that GraphQL support has not been added to every single FreePBX module. Over time, we hope to expand the GraphQL support in FreePBX to cover more modules and more functionality.
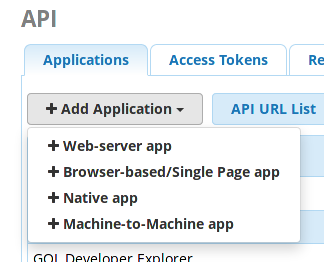
Once that is done, you’ll want to create a new API “Application” in FreePBX. Simply go to the FreePBX administrators panel, and choose “API” from the “Connectivity” menu. Then click on the “Add Application” button and choose “Machine-to-Machine app” as shown below:
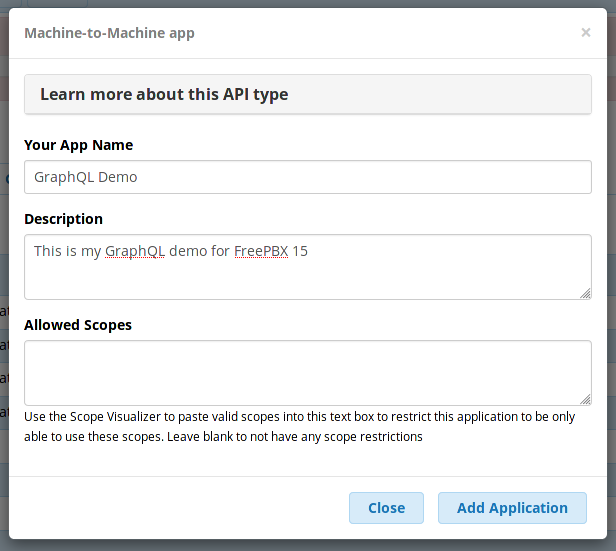
On the next page, give your application a name (such as “GraphQL demo”) and a description. For now, leave the “Scopes” field empty. Scopes are a way of limiting the permissions of an application, but by leaving the field blank, we’re giving this application full permissions. Click on the “Add Application” button.
On the next page, you’ll be presented with all the necessary information to connect to FreePBX via GraphQL. Your information will obviously be slightly different than mine, but it should look something like the following:
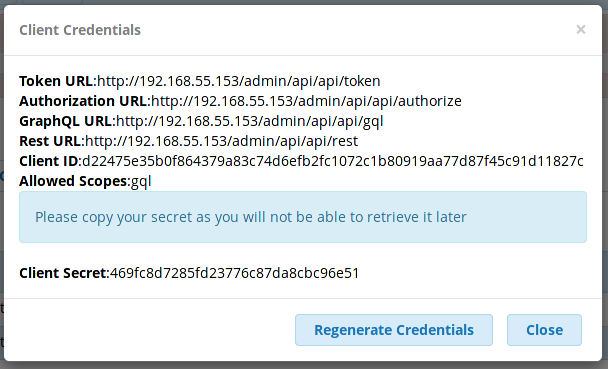
It is vitally important that you copy the “Client Secret” because as soon as you hit the “Close” button you cannot retrieve that value.
Now that we’ve created application credentials, we can use them to play with GraphQL. There are two methods for doing this. The first is the built-in GraphQL Explorer panel. The second is using an external application. I’ll briefly explain how to use both.
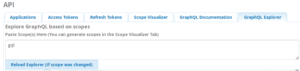
Using the GraphQL explorer
Within the API module in FreePBX, simply click on the “GraphQL” explorer tab. Then, simply type “gql” in the scopes text box, and click the “Reload Explorer” button. This will load the GraphQL explorer with the “gql” scope, which means that you’ll be able to see everything with GraphQL.
You’ll then see the GraphQL Explorer interface, which allows you to test GraphQL queries and mutations directly from your web browser. For example, type the following query to get a list of all the FreePBX modules on your system and their current version:
{
  allModules {
    modules {
      name
      version
    }
  }
}
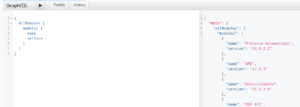
Note how the “data” object returned matches the layout of our query? That’s one of the beauties of GraphQL — the results match the format and layout of the query.
Use an external program for testing
Another way to interact with GraphQL (without writing your own GraphQL client in the programming language of your choice) is to use an external program. There are two popular REST development clients which have added GraphQL support, namely Postman and Insomnia. Since Insomnia was the first to support GraphQL and seems to have more robust GraphQL support, I’ll show you how to configure Insomnia to connect to the GraphQL endpoint in FreePBX.
First, download and install the Insomnia program from https://www.insomnia.rest. Insomnia has clients for Linux and Mac and Windows. Once the program has installed, run the Insomnia client.
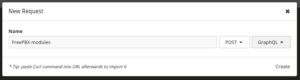
Click on the “New Request” button, give the request a name, select “POST” as the request type, and “GraphQL Query” as the body type. Then click the “Create” button.
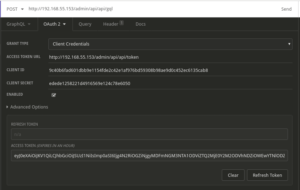
First, let’s tell Insomnia where to send GraphQL requests. In the URL bar at the top (to the right of where it says “POST”, enter the GraphQL URL from the client credentials we created above. From my example credentials, the URL would be http://192.168.55.153/admin/api/api/gql. Yours will obviously be slightly different.
![]()
Next, click on the “Auth” tab at the top of the middle pane. Click the small arrow next to “Auth” to open the drop-down, and select “OAuth 2”. Select “Client Credentials” as the “Grant Type”. Enter the Token URL from the client credentials, as well as the Client ID and Client Secret. Make sure the “Enabled” box is checked. Now, click the “Refresh Token” button at the bottom of the screen. If the “Access Token” is filled in with a long list of letters and numbers, your authentication is working correctly. If you get a 401 error instead, double-check your Client ID and Client Secret and try again.
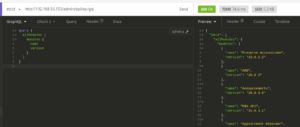
Finally, we can write our query in the “Body” tab. For our first query, let’s list the FreePBX modules and their versions. Click the small arrow next to the “Body” tab, and select “GraphQL Query”. Then type (or copy/paste) the following query in to the “GraphQL” tab:
query {
  allModules {
    modules {
      name
      version
    }
  }
}
Now we can press the “Send” button, and see our results:
There you go! You’re on your way to playing with GraphQL and FreePBX 15! Feel free to look at the documentation, either in the GraphQL Documentation tab in the API module of the FreePBX GUI, or by clicking on the “schema” button in Insomnia.
Technology Preview
Just as a final reminder, please remember that GraphQL support in FreePBX 15 is a technology preview. Not all of the desired functionality has been baked into the FreePBX 15 release. Future module updates will likely add additional functionality to the GraphQL API. We hope that this blog post inspires you to start looking at the GraphQL API. Please give us feedback on what features you would like to see added to FreePBX in the future!